No results found. Try again with different words?
Search must be at least 3 characters.
- How to Add an Extra Field for a Particular Schema Type in Schema Pro?
- How to enable/disable schema markup from post/page?
- How to Add Ratings using Shortcode in Schema Pro?
- How to disable a specific schema markup from post/page?
- How to Add Schema Markup on Subcategories
- How to Disable the White Label Settings Permanently?
- How to Disable Corporate Contact Schema?
- How to Remove Home List Item from Breadcrumblist Schema?
- How to Remove Shop Item Link from BreadcrumbList Schema on Product Page?
- How to Test a Schema Snippet?
- Mapping Your Schema Fields in Schema Pro
- How to Add an Extra Field for a Particular Schema Type in Schema Pro?
- How to Use the Schema Pro plugin?
- What is the All-in-one Schema Pro plugin?
- How to map required fields with Custom Fields?
- How to create a Custom Fields using Schema Pro?
- How to target specific areas of the website?
- How to enable/disable schema markup from post/page?
- How to Add Ratings using Shortcode in Schema Pro?
- How to Add a Schema markup for an Article on your website?
- What is the Difference between the Free and Pro Plugin?
- How to map fields with custom fields from third party plugins?
- How to Accept User Ratings from Users in Schema Pro?
- How to Update Schema Pro?
- How to Register Your Copy of Schema Pro? (License Registration)
- Selecting Organization Type in the Setup Wizard
- Schema Pro Setup Wizard
- Getting Started with Schema Pro
- How To Install Schema Pro Plugin
- How to Add a Schema markup for an Event page?
- How to Add a Schema markup for a Review page?
- How to Add a Schema markup for a Local Business Page?
- How to Add a Schema markup for a Service Page?
- How to Add a Schema markup for a Product page?
- How to Add a Schema markup for a Course page?
- How to Add a Schema markup for a Recipe page?
- How to Add a Schema markup for a Person or About Page?
- How to Add a Schema markup for a Job Posting page?
- How to Add a Schema markup for a Video Object?
- How to add Corporate Contact Markup?
- How to Add a Schema markup for a Book page?
- How to Add a Schema Markup for a FAQ Page?
- How to Add a Schema Markup for a How-To Page?
- How to Add a Schema Markup for an Article Page?
- The Difference: FAQ Schema Type & FAQ Schema Pro Block for Gutenberg
- FAQ Schema Pro Block for Gutenberg
- How-to Gutenberg Block in Schema Pro
How to Add a Schema markup for a Job Posting page?
Every business, big or small needs people to work for them. Therefore a job posting page or a career page is a must when you are looking forward to increasing the strength of your team.
Adding schema markup to your career’s page or a job posting page makes sure that the right candidate finds you in search results and knows that your company is the one to be with.
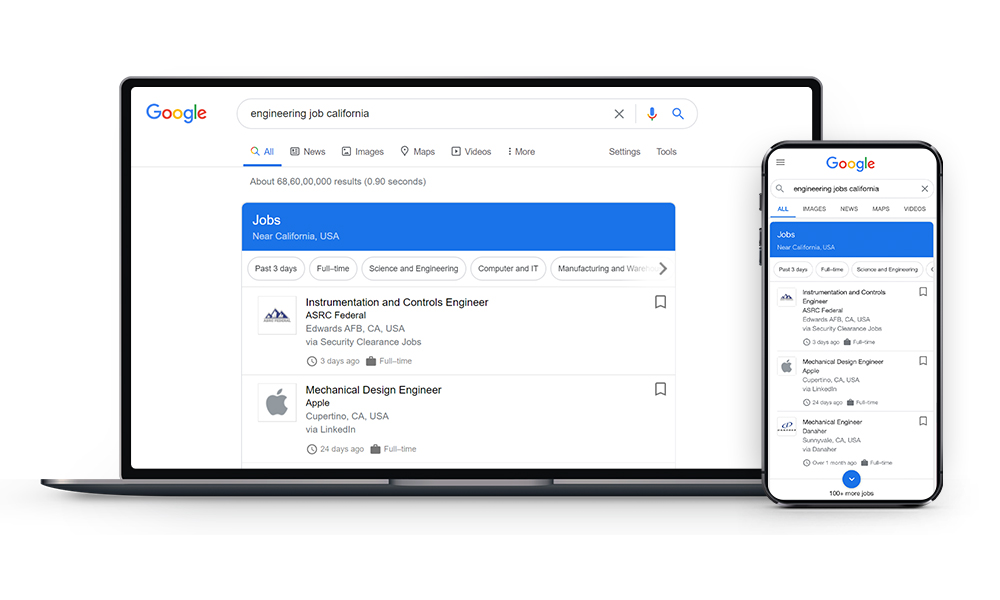
NOTE: The actual appearance of these snippets in search results may vary. To see the most updated style, preview the schema markup in the Rich Snippets Test.
Not only does it boost your website’s SEO, but it also gives you more exposure to those searching for the job posts you are offering. The best way to do that is by adding schema markup by Schema Pro.
The Schema Pro plugin adds a Job Posting schema markup to page/post.
Let’s see how to add job post schema with easy steps –
How to Add the Job Posting Schema Markup?
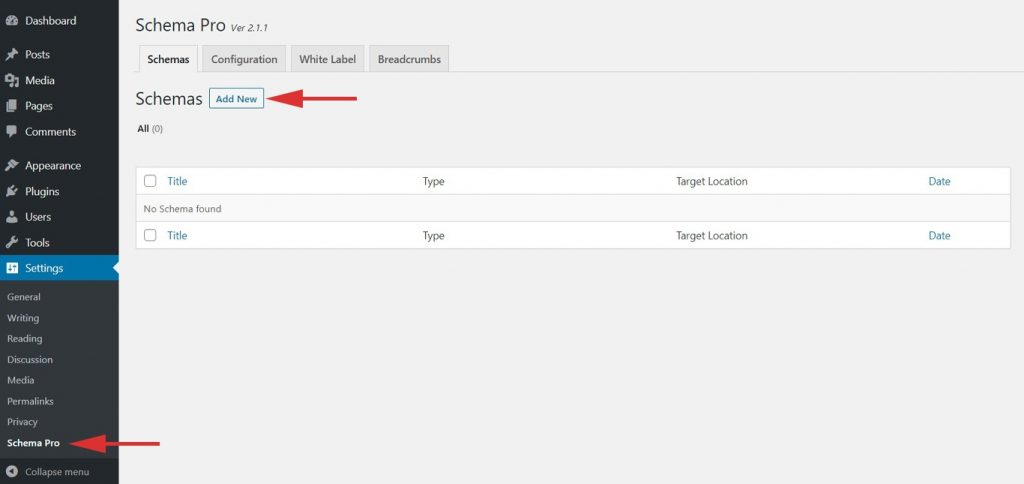
Step 1: Create a new Schema markup by going to the Schema Pro option under WordPress Dashboard > Settings > Schema Pro. Click on “Add New“.
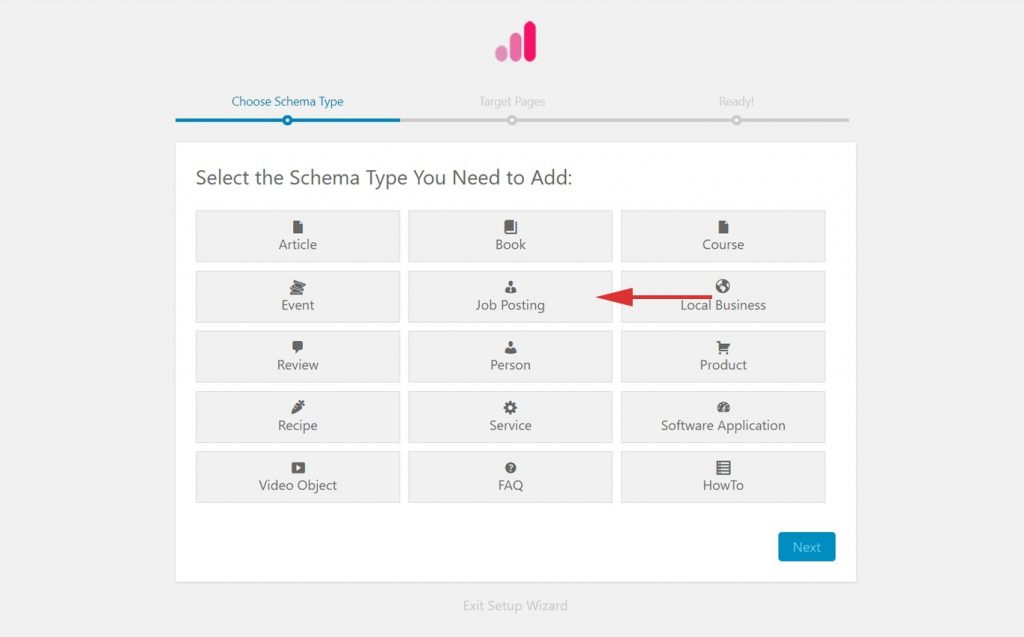
Step 2: Select the type of schema as “Job Posting”.
Step 3: Select the pages/posts that you want to apply this markup to. You can add display rules and also exclude pages and posts you want to exempt this schema from.
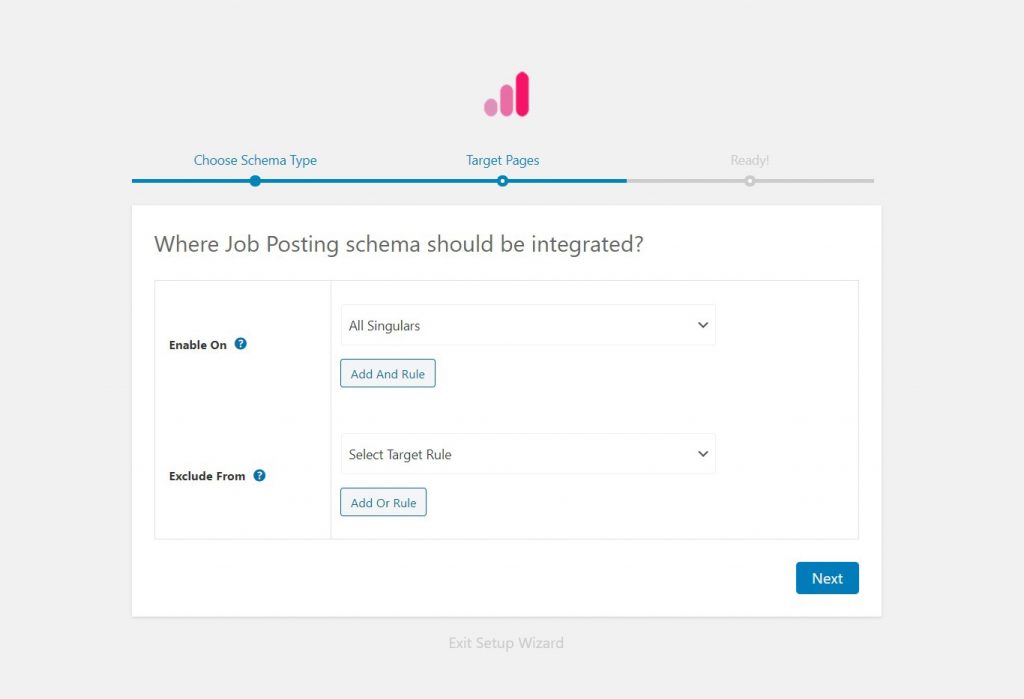
If you want to know more about how you can target specific pages and posts, check out our article on it.
Step 4: You can then complete the setup. From here you will be taken to fill the required properties of the schema.
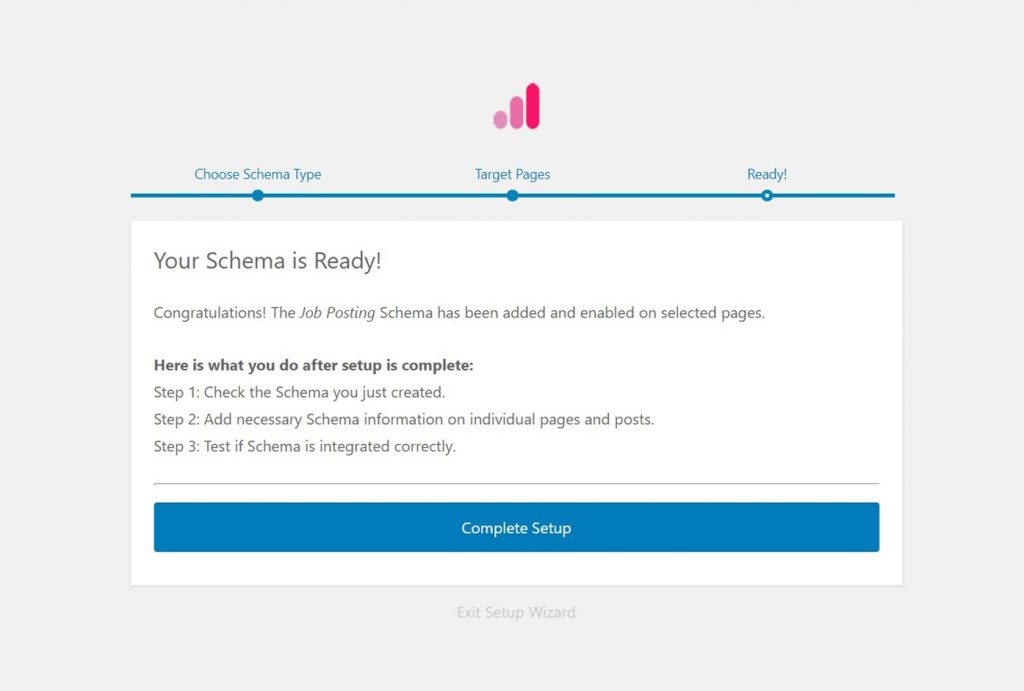
Step 5: In Schema Settings, you will see various fields related to job posting schema. These fields help you enter details about available jobs. We recommend you make sure that all schema fields are put on the right values.
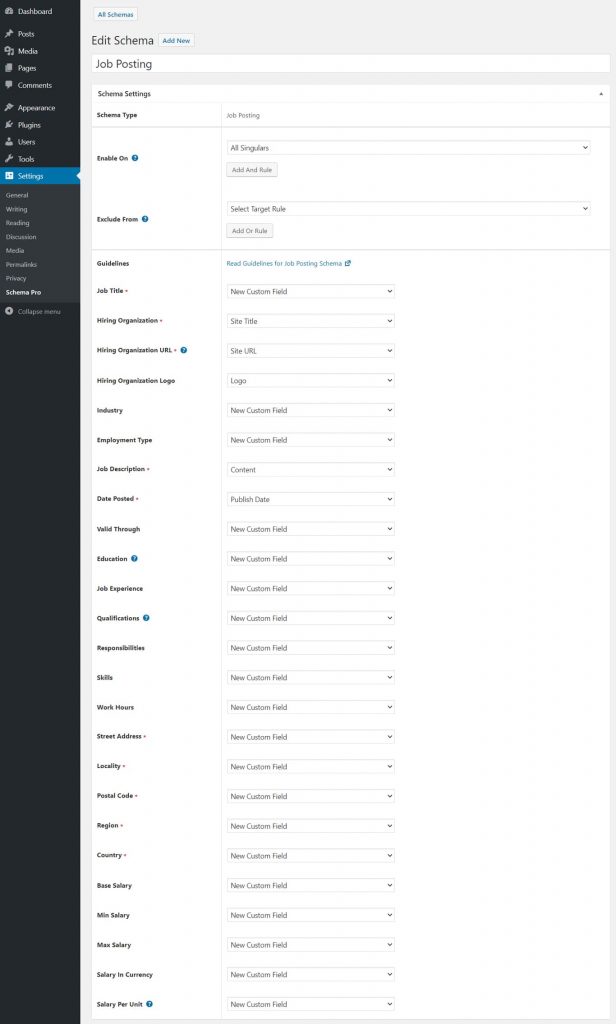
Check out the next section to understand all available fields in the job posting schema markup.
What Do These Schema Fields Mean?
Let’s dive into what all the job posting schema fields mean so that you can fill in the correct values.
In the following table –
– Asterisk sign (*) indicates required fields – These fields are required by Google and if not filled out will result in an error on the Rich Snippets Test.
– Caret sign (^) indicates the recommended fields – These fields are recommended to ensure maximum utilization of the SEO benefits of Schema Pro and will increase your chances of displaying Rich Snippets.
| Fields | What They Mean |
| Title* | This is the title, name, position, or vacancy that you are looking for. |
| Employment Type^ | Type of employment being offered. Good Examples: – Part-time – Full-time – Project-based |
| Organization Name* | The organization offering the job position. *This should be the name of the company (for example, “Starbucks, Inc”), and not the specific location that is hiring (for example, “Starbucks on Main Street”). |
| Description* | The full description of the job in HTML format.The description should be a complete representation of the job, including job responsibilities, qualifications, skills, working hours, education requirements, and experience requirements. The description can’t be the same as the title. Additional Guidelines: – You must format the description in HTML. – At minimum, add paragraph breaks using <br>, <p>, or \n.The feature recognizes the following HTML tags: <p>, <ul>, and <li>. – The feature doesn’t recognize header and character-level tags, such as <h1>, <strong>, and <em>. While the tags won’t affect the formatting in the feature, you can safely include them on the page. |
| Education Requirements | The basic educational requirements you are looking for in a candidate. |
| Experience Requirements | The required experience you are looking for in a candidate. |
| Industry | The industry your organization belongs to. Good Example: – Film – Space – Music |
| Qualifications | The special qualifications are you looking for in a candidate. |
| Responsibilities | The responsibilities that the candidate will be expected to fulfill. |
| Skills | The specific skills you are looking for in a candidate. |
| Working Hours | The working hours of your organization or the job post. |
| Job Location Type | Specify if the job can be done from home. This means employees can or need to work from home. If the job has to be done 100% from home, use the value ‘TELECOMMUTE’. |
| Applicant Location | Even if the job is 100% online, the job applicant must have a specific geographic location(s). Enter at least one country where employees may be located. |
| Date Posted* | Date when you posted this vacancy. |
| Valid Through^ | The date when the job posting will expire. Additional Guidelines: – Recommended Format: YYYY-MM-DD – If a job posting never expires, or you do not know when the job will expire, leave it blank. If the job is filled before the expiration date occurs, remove the job posting. *This is required for job postings that have an expiration date. |
| Street Address* | This is your office street address. |
| Locality* | This is the locality where the office is situated. |
| Postal Code* | Your office address’ postal code. |
| Region* | The region where your office is located. |
| Country* | The country where your office is located. |
| Base Salary | The basic salary you are offering. |
| Salary in Currency | The salary currency. |
| Salary Per Unit | The salary you are offering per unit. |
Not sure how you can fill these fields? You can refer to this article that gives you a clear picture of the fields you see in the drop-down menu.
With Schema Pro you can also add extra or custom fields to your markup. Check out this article to find out how.
Configure Schema on a Single Page/Post
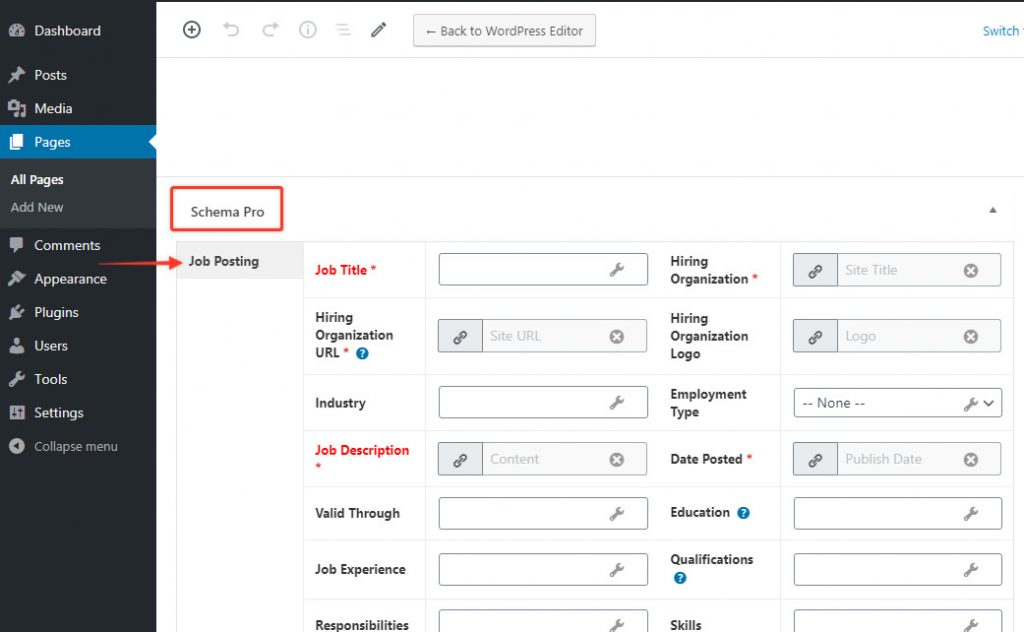
Once you fill the above schema fields, the values will be applied to all target locations. These values are common for all target locations.
But in case you wish to alter these values for a particular page/post, you can also find all the schema fields on each of the targeted pages/posts.
If you visit a single page/post you can see all job posting schema fields at the bottom.
By default, all fields will fetch values from schema under Settings > Schema Pro > Job Posting but you can also change this and choose other values from the list or set the values manually.
You might see some of the fields marked in red, these are required fields in the schema that do not have any value. Skipping these fields will add an invalid schema markup to the code.
Read this article here to learn more about the page-level schema configuration.
Test Your Schema
Once you are done with adding schema markup, test it to see if it sets well.
Testing can be done with just a single click with the “Test Schema” button on the admin bar. Here is an article that will show you how you can test your schema.
OR
you can manually visit the Google testing tool and insert your content.
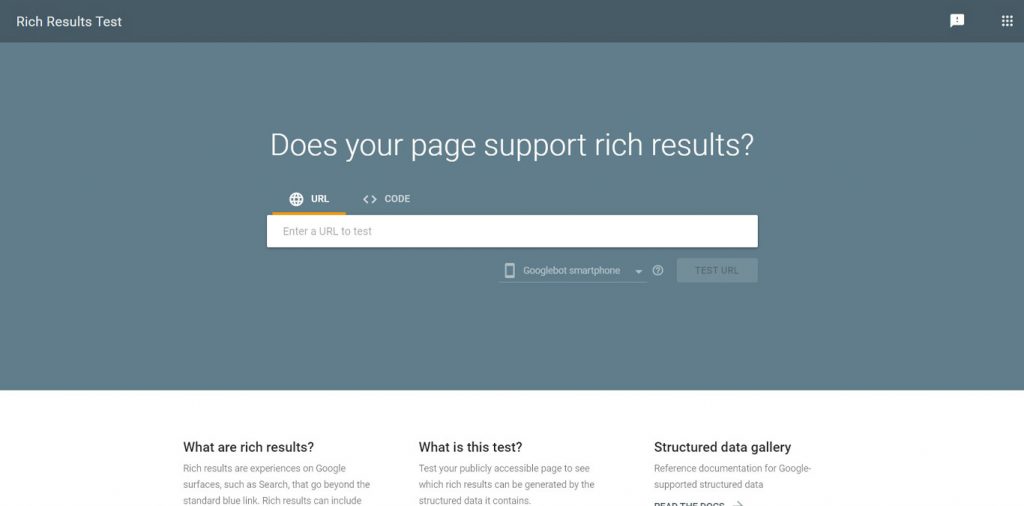
Once you’re done, you’re all set to see your job posts attracting more applications through the search engine’s rich snippets!
How to Handle Errors & Warnings in a Testing Tool?
When you test your page/post with Google testing tool you might see some errors and warnings come up.
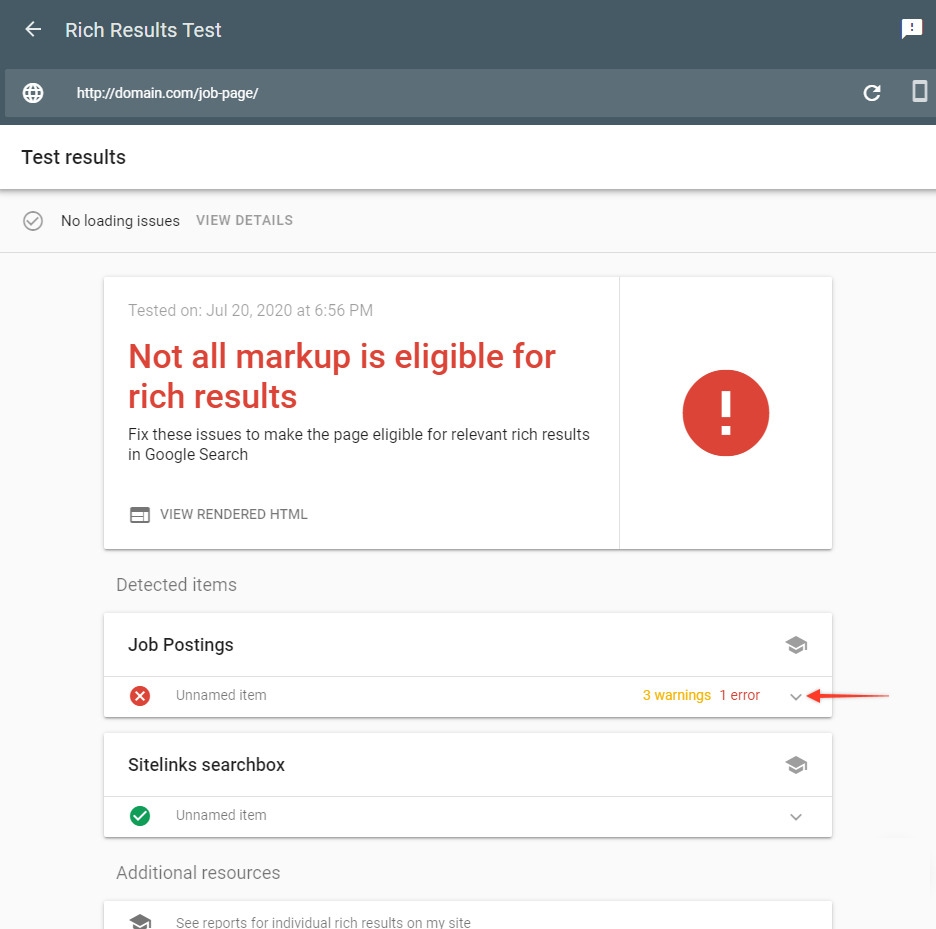
You can easily solve these errors and warnings. But first, let’s find out why they’re there in the first place.
If you miss filling in required fields in the schema setting you will see these errors upon testing. When you submit a page to Google with such errors. You might not be eligible to have your page appear as rich snippets in the Google search results. So it is very important to fix these errors.
Warnings, on the other hand, are basically the recommended fields in schema. They encourage your eligibility to appear in search results. Although they are not must-fill-in fields, they are important and we recommend you fill as many as recommended fields as possible or are applicable.
With zero errors and zero warings you can get maximum benefits.
How To Solve It?
1. Click on the schema type. The box will expand and will show you all the information you filled together with the exact field that has issues.
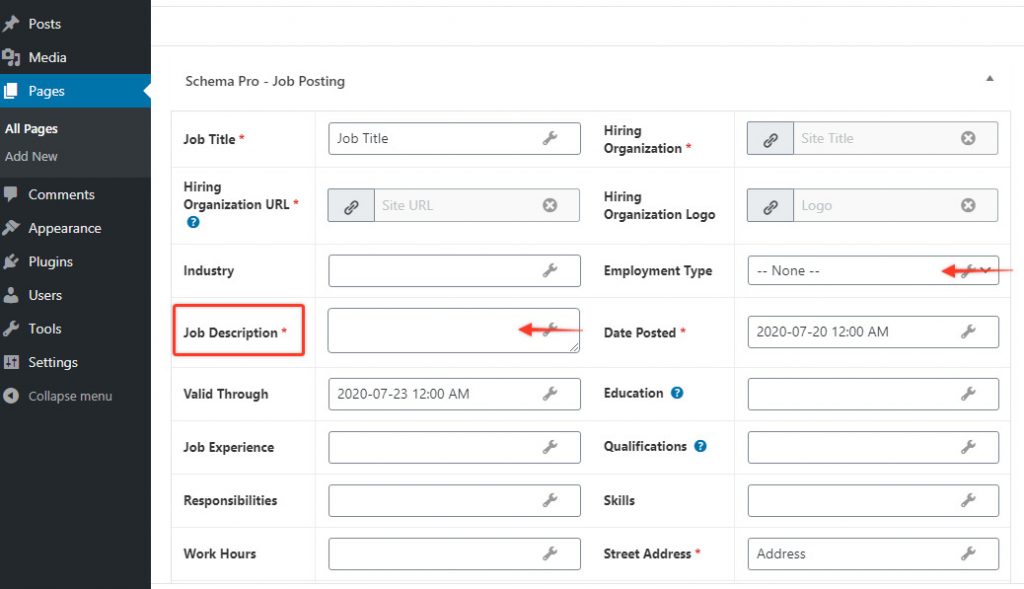
For example – Let’s say a user missed a Job Description field which is a required field. He also missed to select the Employment Type which is a recommended field. Hence he can see an “error” for Job Description and “warning” for Employment Type.
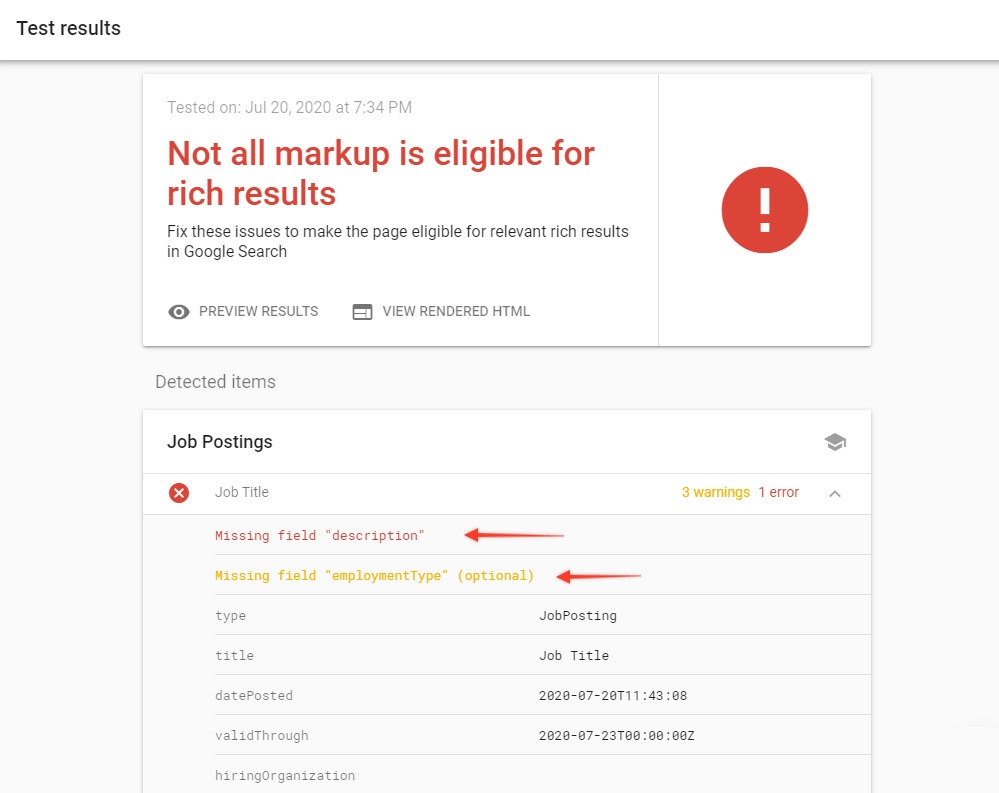
2. Now go back to your WordPress dashboard, look for the job posting, click on “Edit Page” and scroll down to the bottom to find the schema settings for the Job Posting schema. Fill in the required details for both fields as shown in the example below:
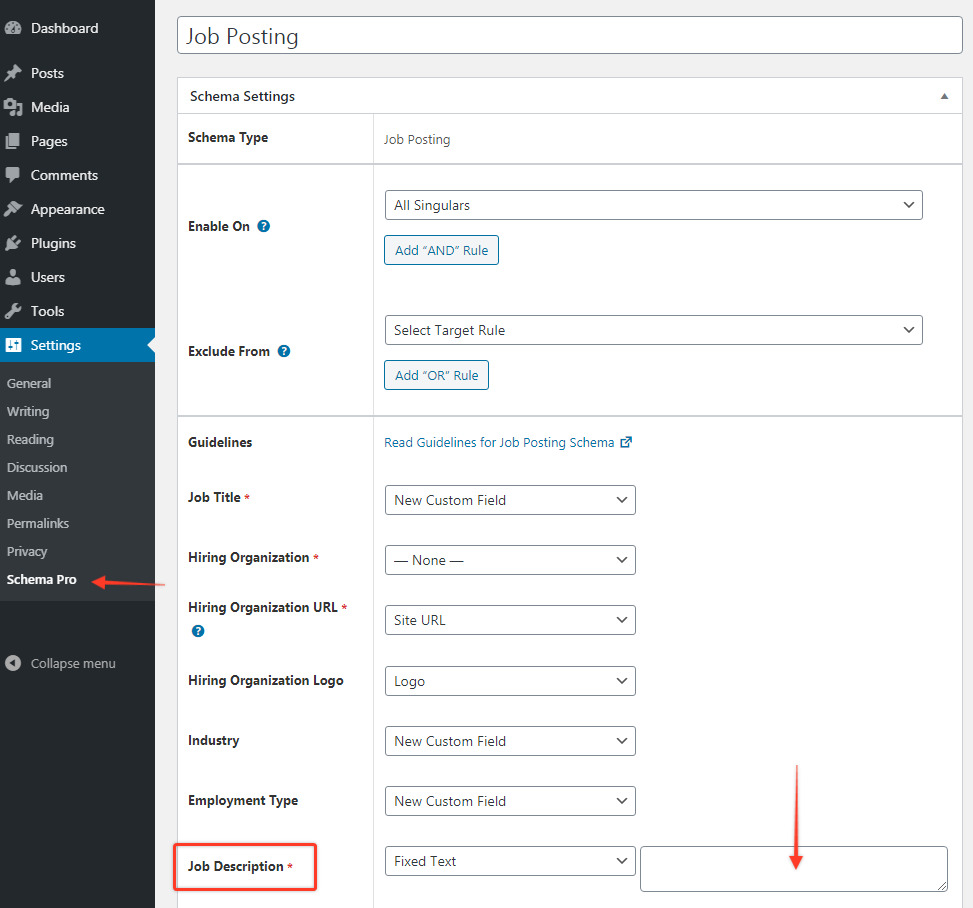
3. In case you haven’t set the schema fields for individual pages/posts and the values are being fetched from the global settings, you can visit Settings > Schema Pro.
Edit Job Posting schema and fill in the required fields. As shown in the example below.
4. Then, test the page again to see if errors and warnings are gone. If not, repeat the process until you see everything solved.
In case you’re still having issues feel free to contact our support team, we’re happy to help.
Setting up other schema types? Check them out below.
We don't respond to the article feedback, we use it to improve our support content.